DIY Jewelry, Key, Utensil, and Grooming Tree Stands Fun Quick Easy and Cheap

Pictures 1 & 2


Quick Easy Cheap and Fun for Any Age
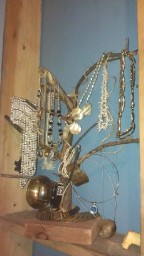
These trees are without a doubt the easiest, most fun to make, and definitely cheapest project I've ever done (and that's saying a lot). Whether it's for kids jewelry, our jewelry, a family key tree, curling irons, picture tree, his own bbq utensil football tree or just a plain need to unclutter a mess stand, these trees can be finished in no time. You can personalize them from sports memorabilia to pictures of your pets (hang collars and leashes), kids, or be bold with metallic gold and red for the young at heart
Use rocks or different colored sticks to write phrases on them. They can be as big or small as you want and the design possibilities just go on and on. .You can paint them or paint the base and tree different colors, glue pictures of your pets to the base and make it a dog grooming tree, kids can do their favorite bands, ok you get the idea.
Pictures #3 and 4


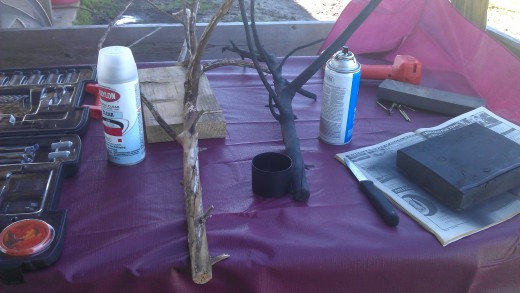
Alright Here Are Some of the Things You'll Need
1) A dead tree (pic #4) or one with dead branches anyway. I know this sounds like the easiest part but actually it is the toughest part of the entire project. Depending on what type of tree your going to make will play a huge factor in the branch you pick. Some examples would be if you're going to be making a jewelry tree (pic #1) you will need numerous branches off your main trunk. If your going to be making a utensil tree you want branches off the trunk that are thicker so they are sturdier and can handle the weight (pic #2). You also need to consider where they're going to be placed so it's not overkill or way to small. Believe me I say it's the hardest part but just get several branches and trim them to make it work. FYI if you break a couple of branches it's no big deal. It would have happen anyway because the branches were to weak to withstand the weight. You will need a saw to retrieve the branches unless you find some on the ground that are usable. Make sure if they are on the ground they are not filled with bugs. I also use a knife to clean off excess dry flakes off the branches before I paint.
2. As you can see in picture # 3 you will need a fairly long screw that is long enough to go through the base and into the trunk so that it is stable. I highly recommend that you don't use nails because it will turn and be less sturdy. You will need a screwdriver or drill to attach the screw.
3 Depending on the base you use, you will need to be able to cut the wood with a saw (or have it cut at the store) Use a sanding brick or some sandpaper to smooth off the rough edges.For the bases I use 2" x 6'' pieces that are 6 to 8" inches long or 2" x 10" cut 10 inches long if it's going to be a big tree.
4. You will need paint, sealer, or what ever your going to do to change the color or preserve the wood the way it is. You can see the highly expensive paint I use that came all the way from Wal Mart for a DOLLAR. They had some metallic red on sale but I didn't know I'd be making this many. (Somebody stop me please)
5. You can add whatever else your heart desires whether it be rocks, ($1 at the dollar store and still have 3/4 bag left) twigs, specialty items for holidays, glitter, pictures, etc. Just let your imagination flow. If you put something on the base whether it's pictures, rocks, twigs, etc., do yourself a favor and put a clear coat on it which will make it last a lot longer.
That's it.
Just Have Fun
Somebody Stop Me Please


Instructions for Assembly Careful This May Be To Technical For Some (Just Kidding)
1. After you have finished painting gluing, decorating your base and tree take the screw and try to center it in the middle of the base (this will keep it from falling over). Drill the screw in until you can see the point coming out the other side. Place the center of the trunk on the screw and hold firmly while you finish drilling
THAT'S IT YOUR DONE!!!!!
Helpful Hint If you find for whatever reason that you want to change the base, (ex; daughter makes a picture tree of her and the boyfriend and they break up) just unscrew the base and make another one. Of course you will need to change the pictures on the tree. FYI you can buy the little frames at the dollar store around 4 for $1
You or the Kids Want to Make Some Extra Money or Save Some
There is nothing like having something personalized for pets, you etc.. So when the kids or your friends and family see the trees, charge something to make one for them. Hey it will keep them busy and give them a little extra cash. You can also give them as gifts. What better way to show someone you care than taking the time to personalize their gift.
Have an incredible day and happy projecting.
PS While I was making these I came up with a jewelry project. I just have to find a better way to put it together and I'll post it. See ya


